_edited.png)
Hallestam Crochet Atelier: How to Crochet a Magic Ring — A Gentle Start to Your Crochet Journey
- Hallestam Design

- Nov 27, 2025
- 3 min read
Welcome to the very first chapter of the Hallestam Crochet Atelier — an elegant, curated learning series designed to guide you through the foundations of crochet with clarity, confidence and heart. Whether you are completely new to crochet or simply want to refine your technique, this Atelier will help you build a strong, beautiful foundation to grow from.
And today, we begin with one of the most important skills of all: the Magic Ring.
✨ Why the Magic Ring Matters
The Magic Ring (also known as the magic circle or adjustable ring) is the starting point for many circular crochet projects — from coasters and amigurumi to bags, flowers and decorative motifs. It allows you to create a perfectly tight, closed center with no visible hole, giving your work a polished, professional look.
For structured crochet pieces, like many Hallestam Design accessories, a clean starting point makes all the difference. A neat beginning sets the tone for a neat finish.
✨ What You Need (Basic Setup)
Before we begin, prepare your materials:
A crochet hook (5.0 mm is a comfortable beginner size)
Smooth, medium-weight yarn
A stitch marker (optional but helpful)
Scissors
This first step is as much about the motion as it is about understanding how yarn behaves. Don’t worry about perfection — that part comes with repetition.
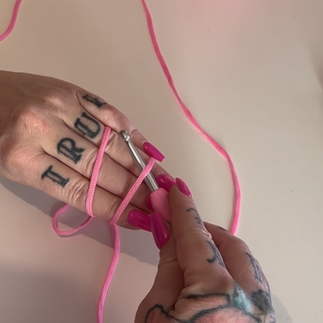
✨ How to Crochet a Magic Ring (Step-by-Step)
1. Wrap the yarn
Lay the yarn tail across your palm.Wrap the working yarn behind your fingers, creating an “X” shape across your palm.


2. Insert your hook
Slide your hook under the bottom strand, catch the top strand, and pull it through.
You now have a loop on your hook — this is the beginning of your adjustable ring.


3. Chain one
This locks your loop and prepares the ring for your stitches.


4. Work your stitches into the ring
Insert your hook into the circle and crochet the number of stitches your pattern requires (often 6 single crochets for beginners).
Each stitch should go around both the yarn tail and the ring, ensuring you can close it later.
5. Pull the ring closed
Take the yarn tail and gently pull.The ring tightens beautifully, creating that clean, seamless center.
6. Join the round or continue in a spiral
Depending on your project:
Joined rounds: Slip stitch to the first stitch
Spiral rounds: Place a stitch marker in the first stitch and continue working around
Congratulations — you’ve just mastered the Magic Ring!
✨ Common Mistakes & How to Fix Them
“My ring won’t close tightly.”
→ Ensure you’ve crocheted around both the ring and the yarn tail.→ Pull firmly but smoothly on the tail.
“My ring slips open again.”
→ Make sure your first chain is secure.→ Tighten the ring again and work the next round promptly.
“My stitches feel uneven.”
→ Focus on steady tension.→ Practice slowly — the Magic Ring becomes easier with muscle memory.
✨ Practice Exercise: Your First Crochet Circle
To build confidence, try this simple exercise:
Make a Magic Ring
Crochet 6 single crochets (sc) into the ring
Pull the ring tight
Crochet 2 sc into each stitch around (12 stitches)
Crochet 1 sc + 2 sc in next stitch, repeat (18 stitches)
You now have a perfect, beginner-friendly circle — the foundation for coasters, flowers, bag bases, and future Hallestam projects.
✨ Why We Start Here
In the Hallestam Crochet Atelier, we build from the inside out — just like creating a handcrafted bag or accessory. A strong core gives you freedom to grow with precision and elegance.
Mastering the Magic Ring prepares you for:
working in the round
amigurumi techniques
base constructions for bags
shaping circular motifs
confident increases and decreases
And because the Hallestam Crochet Atelier is designed as a guided journey, a new chapter will be released every Wednesday. The next lesson — Single Crochet Mastery: Building the Foundation — arrives next week..


Comments